

In front-end systems, “state management” plays a crucial role.
Previously, we introduced the StatefulWidget as one of the functionalities for managing states. However, implementing an app with multiple screens and functionalities complicates state management due to the increased number of states that need to be managed.
An excellent package that simplifies state management is Riverpod. This time, we’ll discuss Riverpod, specifically its version 2.
What is Riverpod?
Riverpod is a tool for defining global states.
While variables and constants can be globally defined by changing their scope,
managing states in front-end systems is not as straightforward.
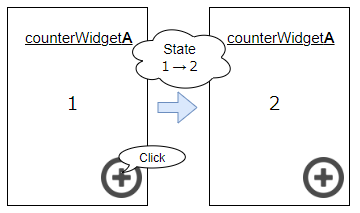
This is because states are deeply intertwined with Widgets, and as states change,
Widgets need to be rebuilt.
Managing the same state information across multiple Widgets further complicates matters.
Riverpod simplifies this process, although it’s more than just a tool for using global variables.
In this article, we’ll limit our explanation to the basics.
About State Management
Before delving into Riverpod, let’s talk about state management.
State
Simply put, a state is a variable that affects the information displayed on the screen.
For example, user information of a logged-in user, information in a ToDo list,
the selection status of a checkbox, etc., are all states that impact the display.
Widgets monitor these states and rebuild the screen whenever there’s a change.
State Management
State management involves appropriately updating or deleting these states and reflecting
them on the screen. States can be local or global.
- Local State
Used only within a single screen or Widget,
such as values in a text field or a counter that’s only used in that particular screen. - Global State
Shared across the entire app,
such as user information displayed on the home screen or user information screen.
Flutterには状態管理のため”StatefulWidget”が用意されています。
しかし、”StatefulWidget”でグローバルな状態を管理しようとすると複雑になります。
Flutter provides StatefulWidget for state management. However, managing global states with StatefulWidget can become complex, especially when states need to be passed between screens or might be updated on other screens, requiring synchronization features.
With Riverpod, the Provider monitors states and automatically conveys changes to the affected Widgets, eliminating the need for such synchronization features.
About Riverpod
Riverpod is an open-source package designed to facilitate state management in Flutter using the following functionalities:
- Notifier
Manages the logic for state changes or updates. It plays a role in updating states and notifying Widgets of these changes. - Provider
Widgets use Providers to reference or update the values of states (Notifiers).
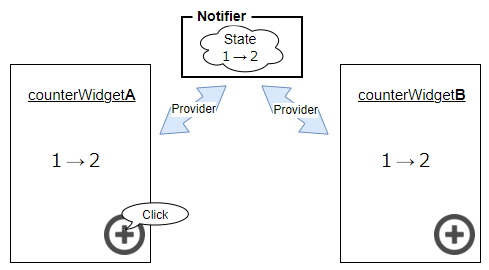
Using Riverpod, updates in WidgetA can be conveyed to WidgetB, as depicted above.
How to Use Riverpod (Overview)
When using Riverpod, you need to prepare the following:
- State class
- Notifier
- Provider
From version 2.0 onwards, “Riverpod Generator” automatically creates the Provider.
Basic Usage of Riverpod
We’ll introduce the basic usage of Riverpod using a ToDo app as an example.
Configuration File
Add the following packages to your pubspec.yaml:
dependencies:
  flutter_riverpod:
  riverpod_annotation:
  freezed_annotation:

dev_dependencies:
  build_runner:
  riverpod_generator:
Riverpod-related Packages
flutter_riverpod:The package for using Riverpod in Flutter.
riverpod_generator:Automatically defines Riverpod Providers.
riverpod_annotation:Annotations used by riverpod_generator.
Other Packages
build_runner:Executes the actual code generation.
freezed:Creates immutable classes.
freezed_annotation:Annotations used by freezed.
Defining the State Class
The class used as a state needs to be immutable.
You can define an immutable class using freezed as follows:
import 'package:freezed_annotation/freezed_annotation.dart';

part 'todo.freezed.dart';

@freezed
class Todo with _$Todo {
  factory Todo({
    required String id,
    required String description,
    required bool completed,
  }) = _Todo;
}
Benefits of Immutability
An immutable class cannot be updated once created.
In contrast, instances of non-immutable classes are passed by reference,
meaning the address of the value is passed, not the value itself.
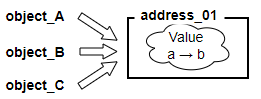
This can lead to unintended updates, as updating the value of an instance passed as
an argument can also change the value of the instance in the calling context.
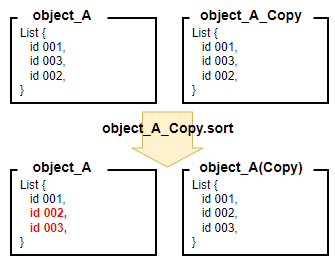
Such unintended updates can occur without errors, making them hard to detect.
To prevent such unintended changes, Riverpod prefers managing states with immutable classes, allowing updates only when intended.
Defining the Notifier
Based on the class defined above, we define a Notifier that includes logic for updating or adding states:
import 'package:riverpod_annotation/riverpod_annotation.dart';
import 'todo.dart';

// This file is created when you run the build runner in the following procedure
part 'todo_notifier.g.dart';

@riverpod
class TodoNotifier extends _$TodoNotifier {
  @override
  List<Todo> build() {
    return [];
  }

  // add
  void addTodo(Todo todo) {
    state = [...state, todo];
  }

  // delete
  void removeTodo(String todoId) {
    state = [
      for (final todo in state)
        if (todo.id != todoId) todo,
    ];
  }

  // Switching "completed"
  void toggle(String todoId) {
    state = [
      for (final todo in state)
        if (todo.id == todoId)
          todo.copyWith(completed: !todo.completed)
        else
          todo,
    ];
  }
}
This article is intended to give an overview of Riverpod, so a detailed description of the process is omitted.
Executing Riverpod Generator
Run the following command in the terminal:
flutter pub run build_runner build --delete-conflicting-outputsThis initiates the Riverpod Generator, creating .d.dart files.
This command also triggers freezed, generating .freezed.dart files.
The Provider is created by Riverpod Generator.
If you look at the ~.d.dart that is created, you will see that the Provider is defined.
// GENERATED CODE - DO NOT MODIFY BY HAND

part of 'todo_notifier.dart';

// **************************************************************************
// RiverpodGenerator
// **************************************************************************

String _$todoNotifierHash() => r'1330ee68f148d9ff18b1e0370e3f3541ab67c621';

@ProviderFor(TodoNotifier)
final todoNotifierProvider =
    AutoDisposeNotifierProvider<TodoNotifier, List<Todo>>.internal(
  TodoNotifier.new,
  name: r'todoNotifierProvider',
  debugGetCreateSourceHash:
      const bool.fromEnvironment('dart.vm.product') ? null : _$todoNotifierHash,
  dependencies: null,
  allTransitiveDependencies: null,
);

typedef _$TodoNotifier = AutoDisposeNotifier<List<Todo>>;
// ignore_for_file: type=lint
// ignore_for_file: subtype_of_sealed_class, invalid_use_of_internal_member, invalid_use_of_visible_for_testing_member
Widgets Using Riverpod
You need to declare the scope of use for Riverpod:
import 'package:flutter/material.dart';
import 'package:flutter_riverpod/flutter_riverpod.dart';
import 'todo_item.dart';
import 'todo_notifier.dart';

void main() {
  // Declare the scope in which Riverpod is used in "ProviderScope".
  runApp(ProviderScope(child: MyApp()));
}

class MyApp extends StatelessWidget {
  @override
  Widget build(BuildContext context) {
    return MaterialApp(
      home: TodoItemListPage(),
    );
  }
}

// Define a widget that uses Riverpod in "ConsumerWidget".
class TodoItemListPage extends ConsumerWidget {
  @override
  // "WidgetRef ref" is the context for using Provider.
  Widget build(BuildContext context, WidgetRef ref) {
    // "ref.watch" monitors the Provider and detects status changes.
    List<TodoItem> todoItems = ref.watch(todoNotifierProvider);

    return Scaffold(
      appBar: AppBar(title: Text('todoItem List')),
      body: ListView.builder(
        itemCount: todoItems.length,
        itemBuilder: (context, index) {
          final todoItem = todoItems[index];
          return ListTile(
            title: Text(todoItem.title),
            leading: Checkbox(
              value: todoItem.completed,
              onChanged: (bool? newValue) {
                // "ref.read" calls a Notifier method from the Provider.
                ref.read(todoNotifierProvider.notifier).toggle(todoItem.id);
              },
            ),
            onLongPress: () => ref.read(todoNotifierProvider.notifier).removeTodo(todoItem.id),
          );
        },
      ),
      floatingActionButton: FloatingActionButton(
        onPressed: () {
          // addTodo
        },
        child: Icon(Icons.add),
      ),
    );
  }
}
“ref” stands for reference. The reference path from
the Widget to the state is ref → Provider → Notifier → State.
Upon execution, initial data is displayed, and interacting with checkboxes or long-pressing list items changes the state.
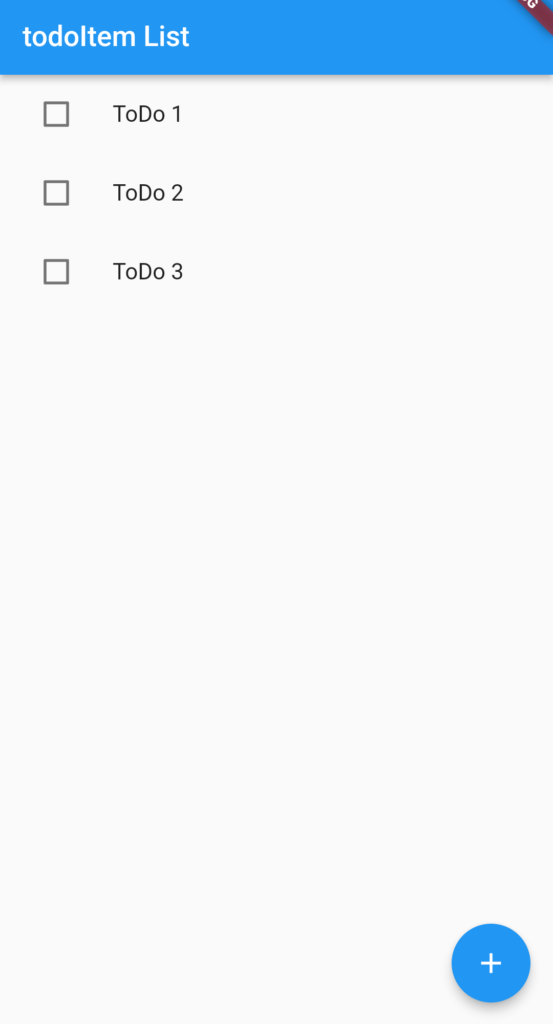
Execution screen
When executed, the initial data will be displayed as shown below.
Tap a checkbox or press and hold a list item to change its state.
Completed!
Conclusion
This article introduced the basics of Riverpod. With its various functionalities, we hope to explore more of Riverpod’s features in the future.
We hope this article helps you understand Riverpod a bit better. Thank you for reading!