

In the world of app development, “MVVM” is a term that you might frequently come across. This article aims to break down the basics of MVVM in an easy-to-understand manner, including a code example implemented in Flutter.
Overview of MVVM
MVVM (Model-View-ViewModel) is a software design approach aimed at separating app logic from the UI (User Interface) to enhance development efficiency and maintainability.
It’s a methodology designed around the roles of “screen display,” “data operations,” and
“data definition” among others.
Similar methodologies like MVC (Model-View-Controller) also exist.
Components of MVVM
The structure of MVVM is composed of three main components:
Model, View, and ViewModel.
View
The UI part that is presented to the user.
The data displayed is obtained from the ViewModel.
In Flutter, this is represented by Widgets.
ViewModel
Handles the complex logic of the app.
It processes the data to be passed to the View (such as calculations and decisions).
The data comes from the Model.
Model
Defines the data and performs CRUD operations on it.
Repository(Supplementary)
Used during the initial data fetch or when saving persistent data.
It conducts DB CRUD processes and data processing, then passes the data to the ViewModel.
Relationships Among MVVM Components
The relationships among the structural components are as follows:
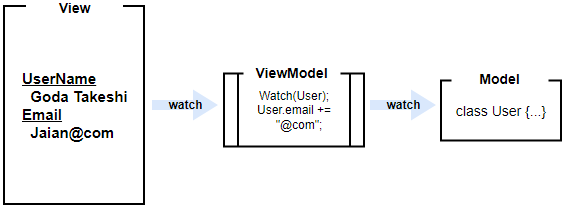
In Flutter, state changes are implemented and detected using tools like Riverpod.
Using Riverpod allows state changes to be detected in the View,
triggering a re-render of the screen.
Advantages of MVVM
The primary advantage of MVVM is the separation of the View, ViewModel, and Model, which simplifies each component and eases management.
However, modifications in the Model could potentially impact the ViewModel and View, possibly expanding the scope of changes required.
Example Code for MVVM and Repository
Below is an example of the MVVM pattern implemented in Flutter using Riverpod:
// User Model
class User {
  final String name;
  final String email;
  User(this.name, this.email);
}

// Repository
// Typically, data is fetched from a DB or API, but here we return fixed values for demonstration.
class UserRepository {
  Future<User> fetchUser() async {
    return User('Goda Takeshi', 'Jaian@com');
  }
}

// UserViewModel
final userProvider = FutureProvider<User>((ref) async {
  final repository = UserRepository();
  return repository.fetchUser();
});

// UserView
class UserView extends ConsumerWidget {
  @override
  Widget build(BuildContext context, WidgetRef ref) {
    final user = ref.watch(userProvider);
    return Scaffold(
      appBar: AppBar(title: Text('MVVM Example')),
      body: user.when(
        data: (user) => Text('User Name: ${user.name}'),
        loading: () => CircularProgressIndicator(),
        error: (e, stack) => Text('Error: $e'),
      ),
    );
  }
}
In this example, UserView monitors userProvider with final user = ref.watch(userProvider).
The userProvider defines the User class type and calls UserRepository.
Although this example returns fixed values, a real app would implement processes to fetch, update, and manipulate data from a database or API.
Conclusion
This article has introduced you to the MVVM design.
While MVVM is not the definitive best design for every Flutter project,
selecting the most appropriate design approach depends on the app or project.
Hopefully, this article has provided you with a better understanding of MVVM,
making apps that adopt this design methodology more approachable.